Tuesday, June 29, 2021

Active your UAN No. in epfo portal, KYC, PF Passbook etc.

UAN Registration & Activation - Universal Account Number Login - Generate UAN No. - Check UAN Status - Check EPF Passbook Statement...


Todays Universal Account Number (UAN) is very important terms in EPF portal as entire process in EPF services are now online. This articles basically covers the important parts related to UAN services like Withdrawal of PF balance, Checking of EPF balance without employer help, KYC in UAN portal etc.


What is Universal Account Number or UAN ?


The Universal Account Number of UAN is a 12 digit unique numbers assigned to every employee contributing to the EPF. It is generated by Employer and alloted by the Employee Provident Fund Organization (EPFP) which is authenticated  by Ministry of Labour and Employment, Government of India. The Universal Account Number of any employee remains same throughout his job carrier irrespective of the number of jobs under different employer he/she changes in his/her carrier.

It is noted that many employee switches his/her job several time then EPFO allots a new member identification number or EPF Account ID, which is to be linked to the UAN. When new any employee witches to new job through another employer he/she have to request his/her employer to link the new EPF Account ID to their UAN number. In this way UAN is unique ID which keeps many number EPF account ID...


How to Know your UAN number?


To Know your UAN number their are two way which are mentioned below :


1) Through Employer :


You can ask your employer to provide the alloted Universal Account Number provided by the EPFO. Some Employers also print the UAN number in the salay slips of employee from their you also get your UAN Number.


2) Through UAN Portal by using PF credentials :


If UAN number will not get through employer as mentioned in (1). You can obtain your UAN through the EPFO UAN portal also. Steps to get your UAN number through UAN Portal is mentioned below :


A)  Open UAN portal in your browser :- To open EPFO Portal
just type uan login in google browser or below give link below page will appear.

Active UAN No., Know your UAN No.
HOW TO ACTIVE UAN & KNOW YOUR UAN NUMBER ?

B) Click on the tab "Know your UAN" to know your UAN number as shown in the below image.


Active UAN No., Know your UAN No.
HOW TO ACTIVE UAN & KNOW YOUR UAN NUMBER ?


C) After Clicking on Know your UAN below page will appear in your window. Give your detail i.e Mobile number linked with your UAN number in EPFO portal and request for OTP by entering captcha in captcha box. Now, validate the received OTP by entering in the portal.


How to know your UAN?
How to Know your UAN?


D) After doing above process successfully your Universal Account Number (UAN) will be sent to your linked mobile number by EPFO portal immediately.


Thanks, friends for view this article. If you got any help with this article in the topic How to know your UAN. Please express your view in comment section. Stay connected with TECH1BABA BLOG  for more informatics article like this. Blog link given below.

https://tech1baba.blogspot.com


Wednesday, June 23, 2021

Add Social Media Icons in Blogger, Free Social Icons

Add Social Media Icons in Blogger, Free Social Icons


How to Add Social Media Icons in Blogger - Free Social Icons - Social media follow buttons for blogger - Learn Smartly. This article is written in the topic how to add social media buttons to blogger posts, how to add social media widget to blogger, how to add social media icons to blogger header, social media follow buttons for blogger, blogger social media buttons widget, social media icons generator free, free social media widget for blogger etc.  in your Blogspot blog. I have explained the topic very easily. You have to just go through the below given article. People can easily add the social media icon in your blog with the help of this article. Let's start.


Welcome Friends,


First of all you have to make a blog with the help of any free blogging platforms like Blogger.com, Wordpress.com etc. If you are new in blogging and want to create blog and earn some good money by starting blogging. Then see my given tutorial "Learn, how to make/earn money through blogging & Adsense (Blog तैयार कर Adsense से पैसे कमाना सिखें) in Free" link is given below :-

https://tech1baba.blogspot.com/2021/06/learn-how-to-make-money-through.html


Now, Lets starts step by step in the mentioned topic "How to Add Social Media Icons to Blogger?, How do I Add social media icons to my blogger header? etc.". Here we start learning how to add social media follow buttons for blogger :-


A) Create a new blog post in your blogger.com blog and now download free social media icon which are easily available in the internet online and just upload the free social media images which you would like to add in your blog like Facebook icon, Instagram icon, linkedin icon, Watsup, Gmail+, Twitter etc. to the new created post from upload image section. Example shown in the below attached image for your reference.
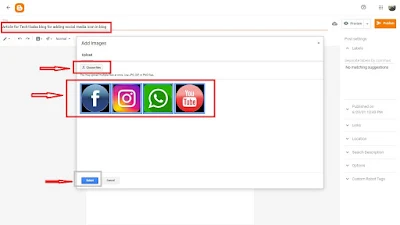

Adding Social Media Icons
Social Media Icons


B) After uploading your social media icons in the new created blog you need to link your icon image with concerned social media platform official link i.e for facebook it will "www.facebook.com", for Youtube icon it will "www.youtube.com" etc. See image for easy understanding.


Hyperlink adding in image file, Hyperlink learning
How do I give hyperlink to an image?


C) After linking the social media icons with social media platforn as show in above image just remove your compose view and go the HTML view. After that you will see your compose article in html view i.e in codeding language. Don't panic for that just follow my instruction. You will see your social media icon hyperling first starting with "<a href="http:// social media link xxxxxxx" after that you will see your image link address startiing with "src="http:// xxxxxxxxx .png"/></a>. Here keep you window open. For your convience I have added a image showning for facebook icon indicating the link look like in your html view please see the image. 


HTML code for adding social media icon in blog
Html code for social media icon

Your social media icon html link looks something like below this :-

"<a href="https://www.facebook.com/" rel="nofollow" style="margin-left: 1em; margin-right: 1em;"><img border="0" data-original-height="167" data-original-width="167" height="116" src="https://1.bp.blogspot.com/-HBNZZ19IQ4I/YNLfcc_sSvI/AAAAAAAAAk4/Xw8uuZFSDaYNhOyEDQDbquO43yWtL0nnwCLcBGAsYHQ/w116-h116/Facebook.png" width="116" /></a>"


D) Now open a new tab in your browser and open your blog here again. After that go to the Blogger and click "Layout" in the left-hand menu. Your blog layout setting opens in right-hand-side of your browser in same-window. Now select the place for the widget. At that place just select "+Add a Gadget" option and select "HTML/Java Script" from the listed option. For better information please see the below attached image.


How to add a Gadget option in blogger.com
How to add social media widget to blogger?


E) Now, a pop up box open for to "Configure HTML/Java Script" in title option just type your social media title like Social media, Social media platform, Social Networks etc. type your title as per your choice. And in "Content section" you have to place the social media icon html link code as explained in point (b). Now go to your previous open tab where your social media icon html links availab. Just copy the link for each social media icon seperatly something looks like this 


"<a href="https://www.facebook.com/" rel="nofollow" style="margin-left: 1em; margin-right: 1em;"><img border="0" data-original-height="167" data-original-width="167" height="116" src="https://1.bp.blogspot.com/-HBNZZ19IQ4I/YNLfcc_sSvI/AAAAAAAAAk4/Xw8uuZFSDaYNhOyEDQDbquO43yWtL0nnwCLcBGAsYHQ/w116-h116/Facebook.png" width="116" /></a>"


As shown in point number (b) image and paste the link here one by one for each social media icons. For better understanding please see the attached image. 


social media html code configuration, how to configure social media icon in my blog
Configuring html code for social media icon in blog

F) Here you have done the whole process. Now save your configure html/java script pop up window and save the blog settings. Open you blog and see your added social media icon in your blog.


Thanks, friends for view this article. If you got any help with this article in the topic blogger social media buttons widget, how to add social media widget to blogger, how to add social media icons to blogger header etc. please express your view in comment section. Stay connected with TECH1BABA BLOG  for more informatics article like this. Blog link given below.

https://tech1baba.blogspot.com


Also Read :  10 Effective Strategies for Boosting Your Website Traffic

Also Read : How to Drive More Traffic to Your Website

Also Read : HOW TO EARN MONEY BY BLOGGING| HOW MUCH CAN EARN BY BLOGGING

Friday, June 18, 2021

How to learn Blogging and earn from blogging ?

How do I learn blogging and then earn from blogging ?


Hi did you really setup your mind for starting a blog. Then you are in correct place. I have spent lot of precious time of my life for searching for such information related to "How to start a blog?" in online. I respect your precious time so I have placed a article to help you in starting a blog and to save your time. One thing more I have written this article in Hindi so you can easily learn the process. So go through the full article so that you can create your blog in short time and very easy way.


Blog तैयार कर पैसे कमाना सिखें।
Learn, how to make money through blogging


 1) सबसे पहले आपको Blog बनाना पड़ेगा। तो चलये Blog बनाना सिखते है।


A) Blog आप बड़े ही आसानी से बना सकते हो Blog बनाने के लिए किसी भी free blogging platform के साईट पर जाएये जैसे की Blogger.com एवं Wordpress.com ये दोनो ही blogging platform आपने आप में लाजवाब है।


B) यहाॅ मैं Blogger.com के बारे में आपको बताने जा रहा हुॅ। सबसे पहले आप अपने computer के web browser को खोले फिर blogger.com के official website पर जाए। आपके सुविधा के लिए लिंक निचे दि गई है।

www.blogger.com

How to learn Blogging and earn from blogging ?
How to learn Blogging and earn from blogging ? 


C) फिर आपको CREATE YOUR BLOG में क्लिक करना है, जैसे की निचे दिए गये फाॅटों में दिखाया गया है।


How to learn Blogging and earn from blogging ?
How to learn Blogging and earn from blogging ? 


D)  जिसके बाद आपको अपने Gmail ID से register कर login करना है। Login होने के बाद आपको आपने blog के लिए अपने अनुसार Title, Blog address & Template चुन कर निचे आ रहीं Create blog option पर क्लिक करनी है। जिससे आपका blog तैयार हो जाएगा।


E) Blog तैयार होने के बाद नया पोस्ट (New Post) डालने से पहले Blog के setting पर जा कर अपने Blog के visibility को on करनी है ताकि आपका Blog किसी भी search engine जैसे की Google, Yahoo etc. में दिखाई देने लगें। यदि आप यह setting को नहीं करते है तो आपका Blog online नहीं दिखाई देगा। ज्यादा समझने के लिए निचे के फाॅटों को देख सकते है।

How to learn Blogging and earn from blogging ?
How to learn Blogging and earn from blogging ? 


F)  आपका Blog online होने के बाद अब आप अपने Blog पर को अछी सी Template set कर ले उनके बाद New Post पर क्लिक कर नये blog post लिख कर अपने blog पर published कर सकते है। g) आपके blog के लिए कुछ जरूरी pages i.e. Disclaimer, Policy Privacy & About Us page  जरूर create कर ले ताकि आपको Google Adsense से आसानी से approval मिल जाए एवं आपको blog के Monetisation आसानी से हो सकें। आपके समझने के लिए निचे दिये गये Blog के फाॅटों को देखें।

How to learn Blogging and earn from blogging ?
How to learn Blogging and earn from blogging ? 


G)  आप Layout option में जाकर आपने ब्लाॅग के लिए logo लगाते हुए अपने अनुसार settings मे बदलाव कर सकते है। लेकिन मेरा सलाह है कि आप नये है तो फिलहाल ज्यादा कुछ न करें सिर्फ blog का logo ही लगाए।


H) अब आप सिर्फ अपने ब्लाॅग पर अच्छे-अच्छे content वाले post डालते जायें ताकि आपके blog पर traffice i.e viewers आना चालु हो जाए। फिर आपको अपने ब्लाॅग को Google Adsense से जोड़े ताकि आपके ब्लाॅग से आपकी कमाई हो सकें।


I) आपको बता दे की कम से कम 20 से 30 अच्छे पोस्ट डालने के बाद एवं 300 से 500 page views आने के बाद ही आप Google Adsense से आपना ब्लाॅग को लिंक करने के लिए apply करें तभी आपको आसानी से Google Adsense की approval मिल सकेगी।


यदि आप blogging अछी तरह से करते है तो महीने के 20,000/- से 40,000/ हजार थोड़ी मेहनत करके आसानी से कमा सकतें है।

Thanks You Friends,

And Best of Luck for your Journey to Blogging.


Please follow for more creative information & share the article to your circle/friends and help them to create a new blog... etc.


Stay connected with TECH1BABA blog more informatic article like this. 


Monday, June 7, 2021

Recruitment of 1086 nos. of Security Guard in ECL

Eastern Coal field Limited (ECL) Recruits 1086 nos. Security Guard (T) for Male member from the existing employees.

ECL Security Guard Recruitment, Job in ECL
Recruitment of 1086 nos. of Security Guard in ECL


1) Recruitment Details for 1086 nos. of Security Guard  in ECL :-

Eastern Coal Field Limited (ECL) has invited 1086 nos. of vacancies for Security Guard from the existing employees of Eastern Coal field Limited (ECL). The application process already started by the ECL from 31.05.2021 and last date of applying is 15.06.2021 in offline mode. The interested candidates from the existing employees of ECL can fill the application form duly signed and can send to the respective Area GMs or HODs of the Establishment/Workshops and in the case of Hq. to Sr. Manager (P/Estb), Personnel Dept., ECL, Sanctoria. Before applying for this Recruitment please read the article completely :-


2) Official Notification link & Details :-

a) 

Post Details

Security Guard (Only for Male)

b)       

Nos. of Vacancies

1086 (from existing employees)

c)  

Application Starts date

31.05.2021

d)       

Application End date

15.06.2021

e)       

Mode of Application

Offline

f)  

Selection Process

 Physical Standard Test as per the Cadre Scheme

g) 

Education Qualification

7th Passed

h)       

Place of Posting

All over India

i)   

Official Notification link

Download Official Notification with application form.

j)   

Fees

0 (No Fees required)


3) Details of  Categories for1086 nos. of recruitment :-

Applying Candidates you should remember the categories of vacancies before applying the vacancies out of 1086 nos. of vacancies curtains nos. are reserved for SC and ST candidates. Categories wise details for 1086 nos. of post is given below :-

a)  Nos. of Post under Unreserved Category     =    842.

b)  Nos. of Post under SC Category                  =    163.

c)  Nos. of Post under ST Category                   =    81.

Total numbers of Vacancy for the Post          =    1086


 4)  Fees for Application :-    No Fees is required for Said Post.


5)   Eligibility Criteria :-

7th Standard Passed and Physical Standard norms as per the Cadre Scheme is required for applying the posts. Candidates who willing to apply for the post may please ensure that they fullfil the criteria of eligibility kept by the department as mentioned in the official notification.


6) Applying process for the Post :-

a) Download the application form (link given above). You can also download the form by visiting official website of ECL (visit Official website). 

b) After downloading the official notification print out the application only.

c) Filled the application form correctly as per your catagory.

d) Send the duly signed application with the relevant document to respective Area GMs or HODs of the Establishment/Workshops and in the case of Hq. to Sr. Manager (P/Estb), Personnel Dept., ECL, Sanctoria by 15.06.2021 (Last date of application).

e) Most Important thing please enclosed the self-attested photo copy of your relevant certificates like Education Certificate/Caste Certificate/ID Card etc.


Friday, June 4, 2021

Create E-PAN card instantly


How to create E-PAN card and get in email? With the help of Aadhar card. Here you can create your PAN card instantly in 10 minute. So read the below article before you start the process.


E-PAN Card in 10 minutes for free


5 मिनट में मुफ्त में पैन कार्ड Online कैसे बनाए, पुर्ण प्रक्रिया सिंखे आसान तरिको में।


1) मुफ्त में PAN Card हेतु जरूरत पड़ने वाली दस्तावेज:-

क.  जिसका पैन कार्ड बनाना हो उस व्यक्ति का आधार कार्ड जिस में मोबाईल या E-mail update हो ताकि OTP प्राप्त हो सकें।

ख.  आधार कार्ड से लिंक फाॅन नं0 साथ में होना चाहित ताकि OTP प्राप्त हो सकें।


1) मुफ्त में पैन कार्ड Online अपलाई करने की प्रक्रिया:-

क. आपने Browser से Income Tax filling 2.0 वेब साईट पर जाए लिंक निचे है।


ख. Income Tax filling वेब साईट पर जाने के बाद साईट के निचे Our Services वाले option पर जाए। जिसमे आपको show more पर क्लिक कर देखना है कि Instant E-PAN का option कहाॅ मौजुद है।  फिर आपको Instant E-PAN पर click करना है।


E-PAN CARD
Create E-PAN card instantly


ग) फिर आपको नया पेन कार्ड बनाने के लिए निचे दिखये गए फाॅटों अनुसार Get New e-PAN पर क्लिक करें। उसके बाद माॅगी गई जानकारी जैसे की आधार कार्ड को डालते हुए आपने जानकारी को OTP के साथ पुष्टी करते हुए नये पेन कार्ड के लिए Apply करें।


E-PAN Card, Form
Create E-PAN card instantly


ध) आपका पेन कार्ड बन जाएगा जिसका सुचना आपके मोबाईल पर मिल जाएगा एवं 10 मिनट के बाद आप अपने पेन कार्ड को निचे दिखये गए फाॅटों अनुसार Check Status / Download PAN पर क्लिक करते हुए आपने आधार कार्ड/पेन सं0 डालते हुए पेन कार्ड को डाॅउनलोड़ कर सकते है। जिसके बाद आप उसे Card Printing shope में  जाकर कार्ड में Print करवा के अपना हस्ताक्षर कर उपयोग में ला सकते हुए है।


E-PAN Card, Check Status / Download from income tax new portal 2.0
Create E-PAN card instantly


दोस्तों अगर जानकारी अच्छी लगी है तो ज्यादा से ज्यादा इस Blog के लिंक को Share करें ताकि आम जानता तक इस सुविधा का लाभ मुफ्त में मिल सकें।

Note :-

Please Share the valued information to every so that every one can get the benefit of above facility generally for common man who cannot affort payment of Rs. 250 to Rs. 500 for making PAN through agent/broker.